
8·
3 days agoNot that I remember, which is probably the reason why it was cut from the film. There is a lot of activity around him and the area around his house in the books, but it’s more side quest than main quest.
Not that I remember, which is probably the reason why it was cut from the film. There is a lot of activity around him and the area around his house in the books, but it’s more side quest than main quest.
Tom Bombadil is probably the biggest omission - both the character and all tge activities that take place around their house. I remembered that sticking out to me when I watched the films for the first time, but at that point I last read the trilogy at least five years prior.

Ah, sorry. That does sound a bit hot for PLA. I still suggest a temp tower. If you’re having bed adhesion issues, have you cleaned your bed with dish soap lately? Be sure to use only paper towel to clean/dry it - not a sponge or towel. If that’s impractical, I’ve found Windex to work better than IPA.
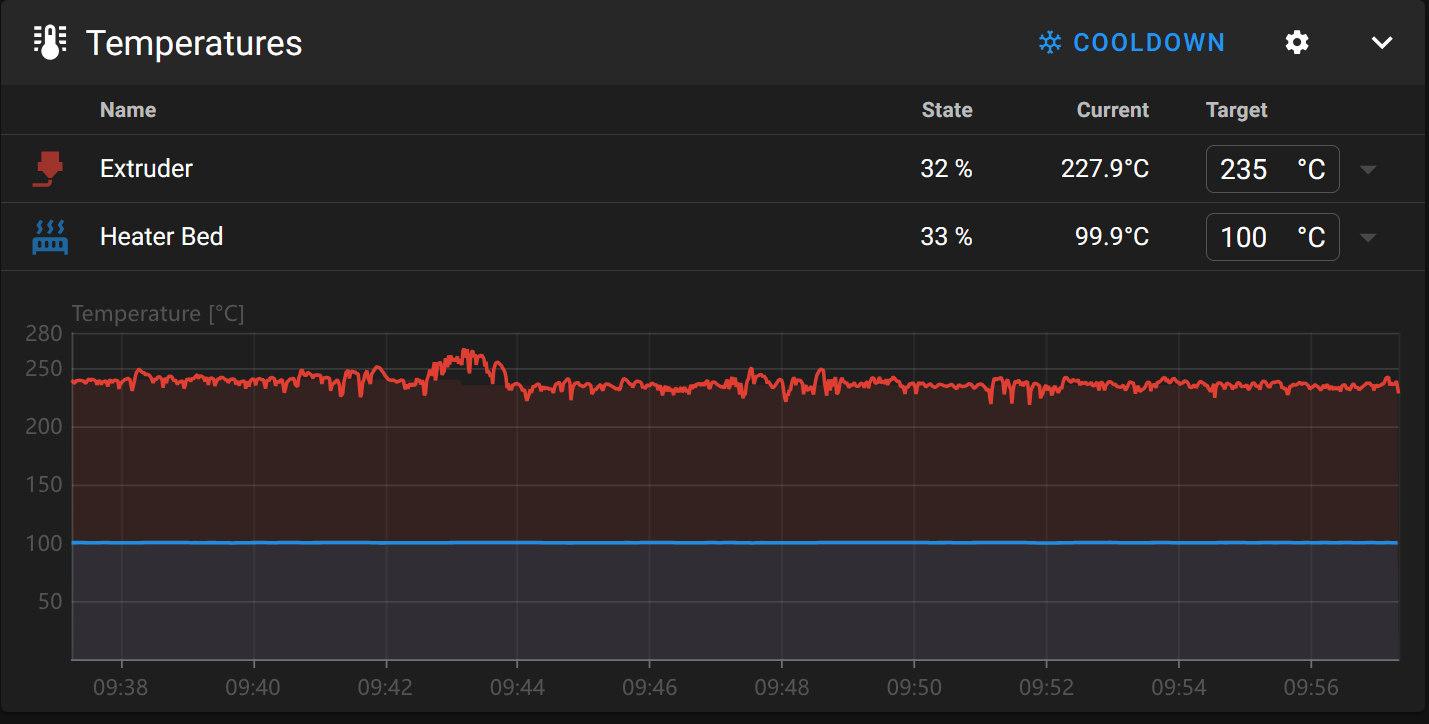
For PETG that’s not that hot. On my i3 clone I was usually 70 bed and 230-235 nozzle. I would try a temp tower and do what looks best. Based on what you’ve said so far, temp does seem like a possible culprit.
https://ingenext.ca/products/boost-50
50 hp for $1k
I can’t find them right now, but there are similar things you can buy to unlock factory features at a discount.
That you’re looking for is called a flange mount. If you search your favorite search engine with “2mm flange mount” you’ll find some results. I do wonder how much torque you’ll be able to transfer, but given the shaft size I suspect you’re not looking at big loads.
They are harsh chemicals and people definitely aren’t even disposong of them correctly most of the time
This is what really gets me with resin printing :(
Aluminum’s expansion coefficient is 0.000023m/C. Using my Voron, let’s say the z extrusions are 530mm long and my extrusions go from 22 °C to 55 °C. This means they grow 0.35mm. That’s in total, so the effect at the print head isn’t 0.35mm, but let’s say my gantry rides 25% of the way up. That’s 0.0875mm, which is roughly 3x the z-offset of my last print.
2.4 owner here. Happy to hear some feedback on the SV08, it looks like a pretty good deal.
Fast (printed something that took 26 hours on the Ender, and it took less than 4 on the SV08
I’m surprised you saw that much of a speed improvement, but I guess I ran my old i3 clone somewhat fast. My print times were a bit faster on my Voron, thanks to cranking speed and acceleration, but the biggest time savings came from taking advantage of the much better hot end and using a 0.6mm nozzle with thicker line widths (I can cover nearly 2.0mm with two perimeters) and thicker layers (0.3 on most prints these days).
Finicky for the initial z-offset. Heat soak the bed for 30 min at 65 degrees, then run the automatic z-offset
Were you homing z with the bed cold? If homing z involves touching the build plate, I could see this. You could probably just adjust your start g-code to accommodate this. One of the nice things about the 2.4 is that the z end stop is bolted to the frame, so as long as your print routine is consistent you can dial it pretty easily.
That said, just wait until you enclose your printer. The frame will grow in z fairly significantly as it heats up. I’ve not let my printer heat soak, printed a number of sequential parts in one print, and watched the first layer squish getting worse and worse with each sequential part. Eventually filament won’t even stick to the build plate, so you need to tweak z-offset.
If you’re a Klipper user, odds are you’ll have easy access to both print hours and filament length extruded. Some marlin printers also track this information as well.
Granted, nozzle wear is also filament specific, but it’s better than nothing.
Let’s start backwards:
All of this sounds somewhat expensive TBH. Consider why you’re considering a new printer then ask yourself what on the market will help meet those needs - especially at your price point.

Up front disclaimer: this is all conjure on my part.
I own an “AI” laptop (only because I was interested in a snapdragon x). Most of the AI enabled features don’t really require a NPU, such as a decent background camera blur, some paint and photo stuff, live captions, etc. Microsoft was looking for a headline feature that didn’t already have a CPU/GPU/cloud implementation. Enter: recal.
IMO this is very much about finding a novel feature, that doesn’t have an alternate implementation. The near term motive is to justify their “AI” PCs to customers in hops that customers adopt them. I suspect the long term goal is opening up a revenue stream for AI - get customers used to “AI enabled” features and then tack a subscription cost onto them, but I truly hope this won’t be the case - especially when the hardware you own has a NPU.
Very cool! What kind of optical quality do you get? The action shot on thingiverse is pretty low resolution :( what does it look like at higher magnification? Any depth of field fun going on thanks to the big sensor?
A few days ago were you printing the same part or a different one? Has anything at all changed with your setup or slicing?
Things I would go after, in order:
I’m personally not a fan of glue or adhesion aids, but to each their own. I’ve had the magnetic build plate pulled up, along with the print, from my bed due to warping in the past, but the warping was due to printing a big part in too cold of an environment. Once I addressed that, my problem went away.
Just an option to throw on the table: https://openscan.eu/
What are you overwhelmed with? Which option to go with? What to expect as far as post processing? Accuracy? Something else?
If cost is your design constraint, and you want a CoreXY design, think about what drives the Voron BOM cost and optimize around that. Without thinking about it too much, the thing that jumps to mind are the 4x (2,4) or 3x (trident) z motors. Reducing beyond 3 will not allow you to get the gantry mechanically in plane with the bed, but that didn’t stop Bambu labs from using a single motor on the z-axis for the x1 and p1. Ditching the cable chains for a CAN or USB toolhead would also probably save some cost out of the gate (fewer wires + you won’t have to buy the cable chains).
Also consider what your design goals are. In the case of single vs 3/4 z motors, you’re trading initial fiddling with cost. A single z motor is going to require more fiddling to get right, but it does save on BOM cost.
Why not just build a Voron? Other than your bed size, nothing else you listed wouldn’t work on a Voron build. If you want to make it your own, the design is fully open source so you can modify to your heart’s content. There are also a ton of “unofficial” and “official” mods.
It’s worth saying that CoreXY != bed slinger, so…
at least for the tap carriage and mount.
I think Microcenter only carries the ‘full’ CNC kit, which was pre-tap when I bought mine
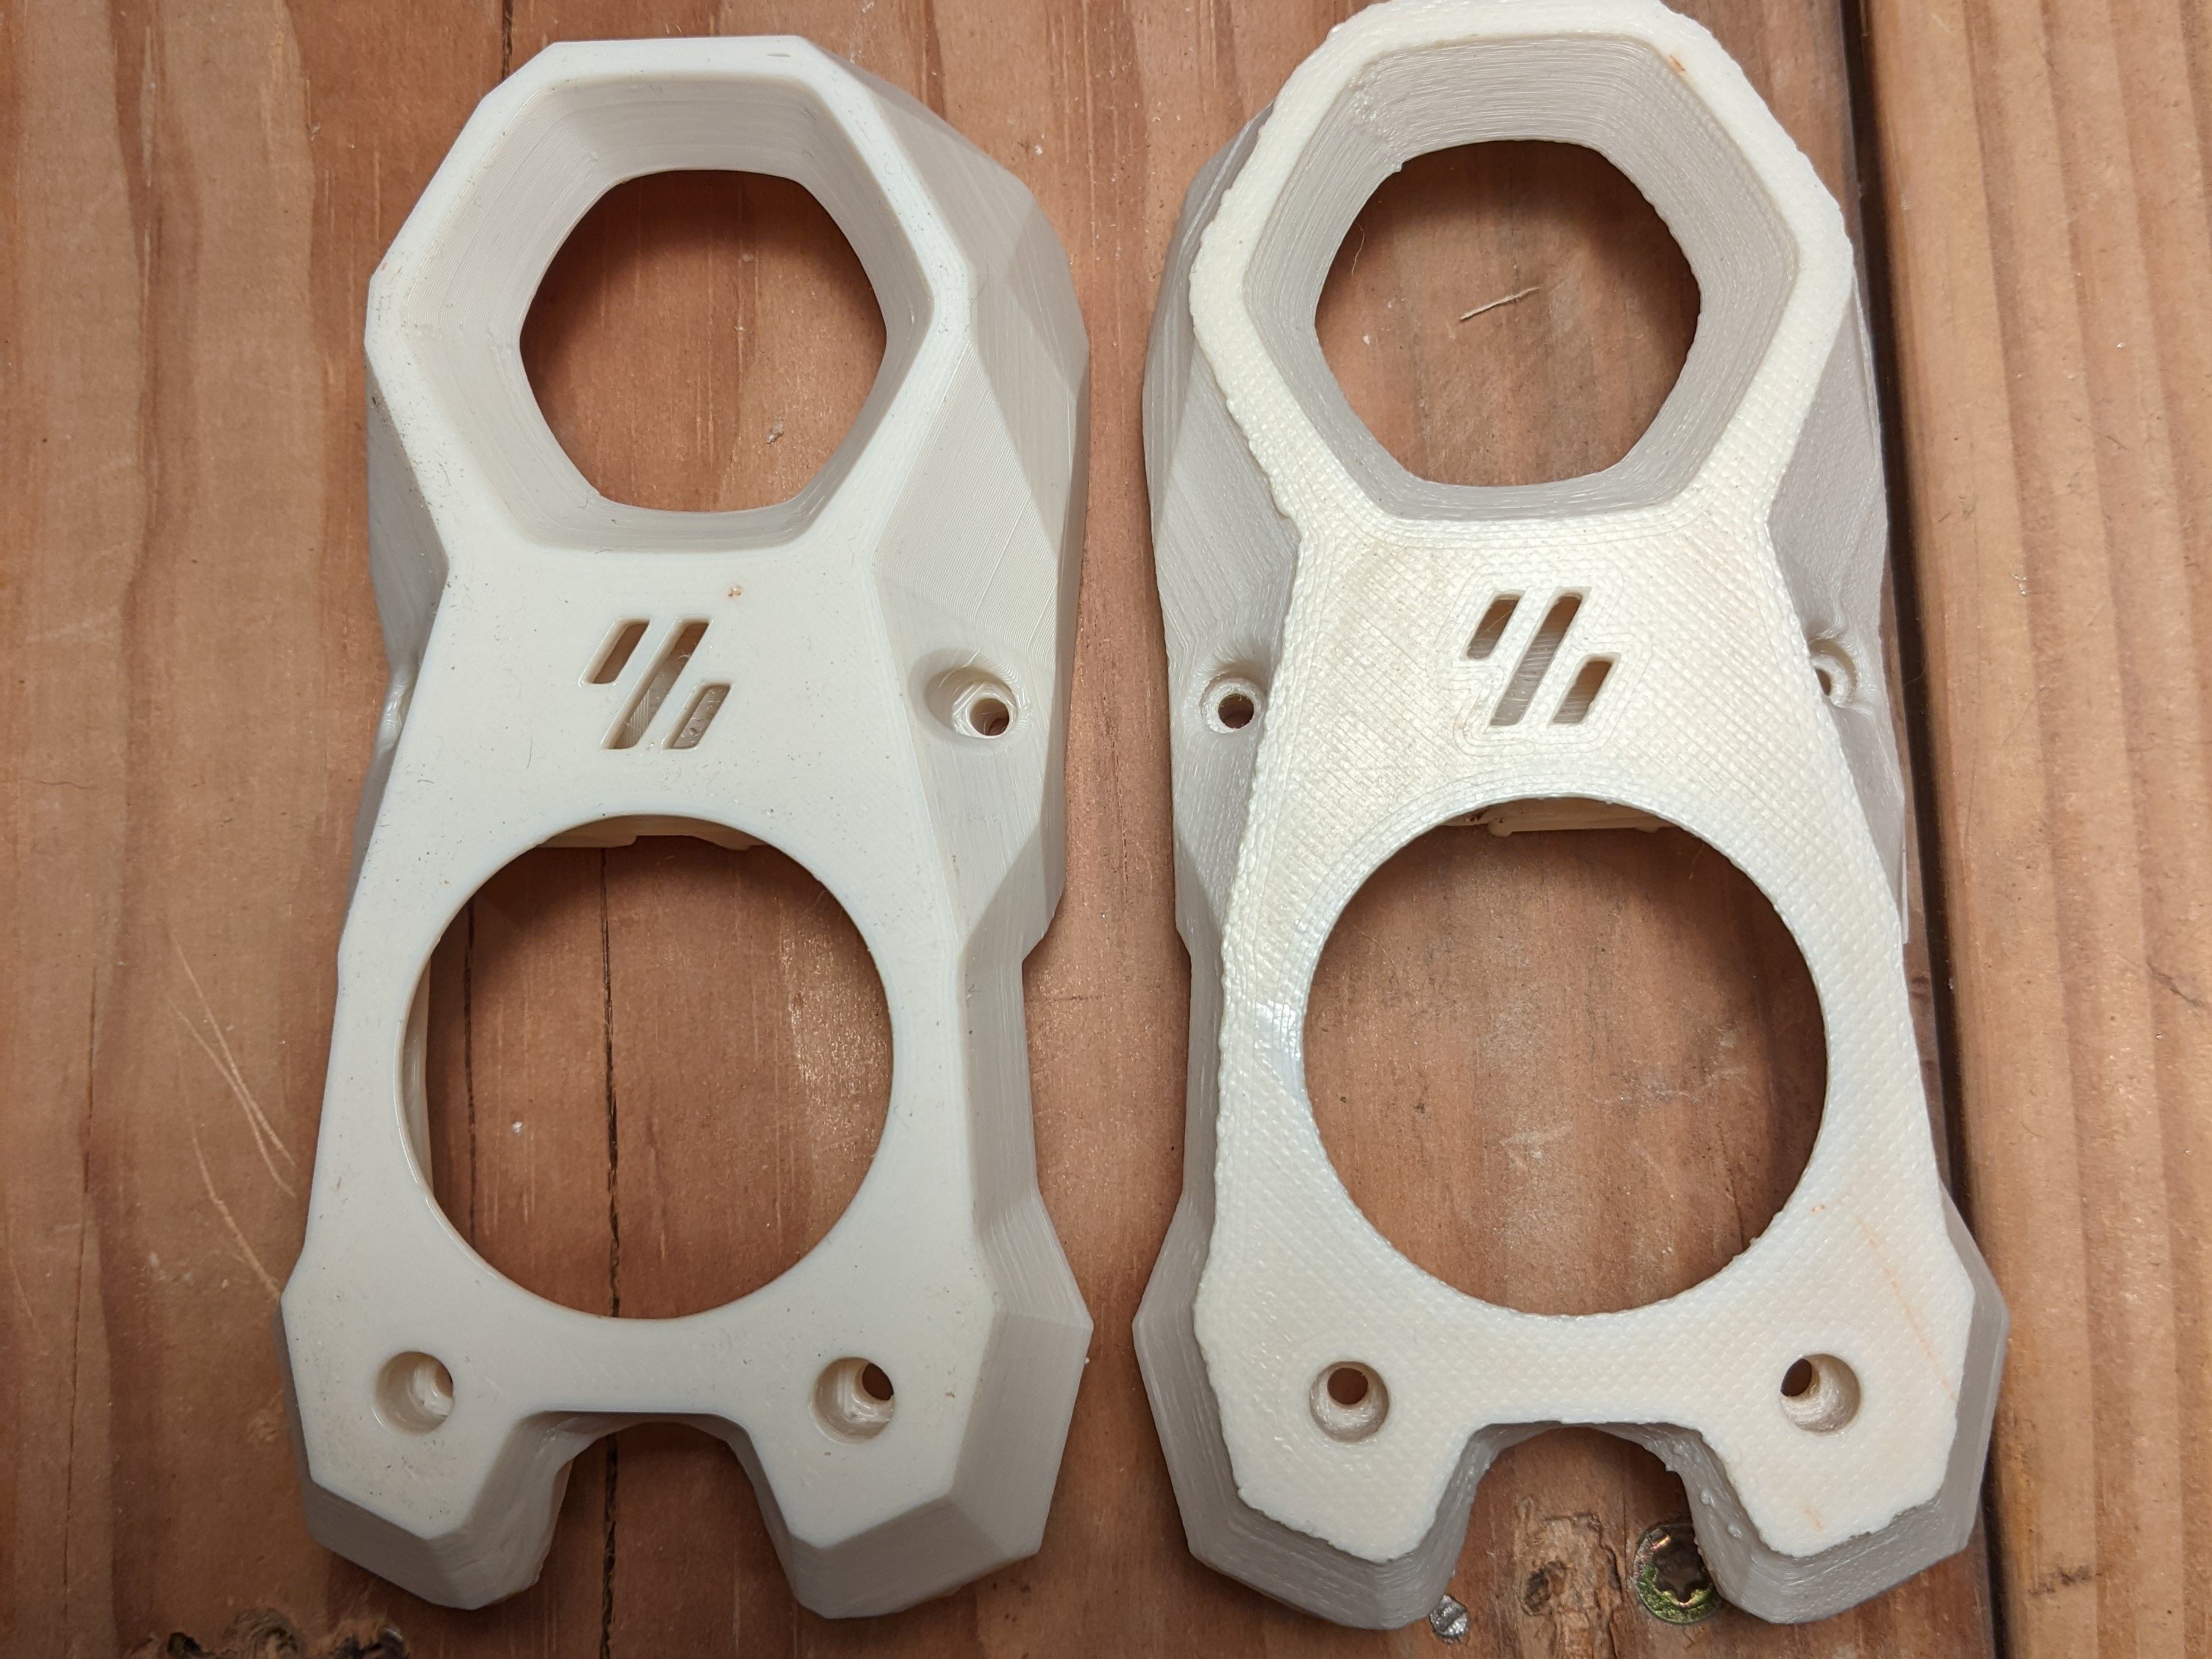
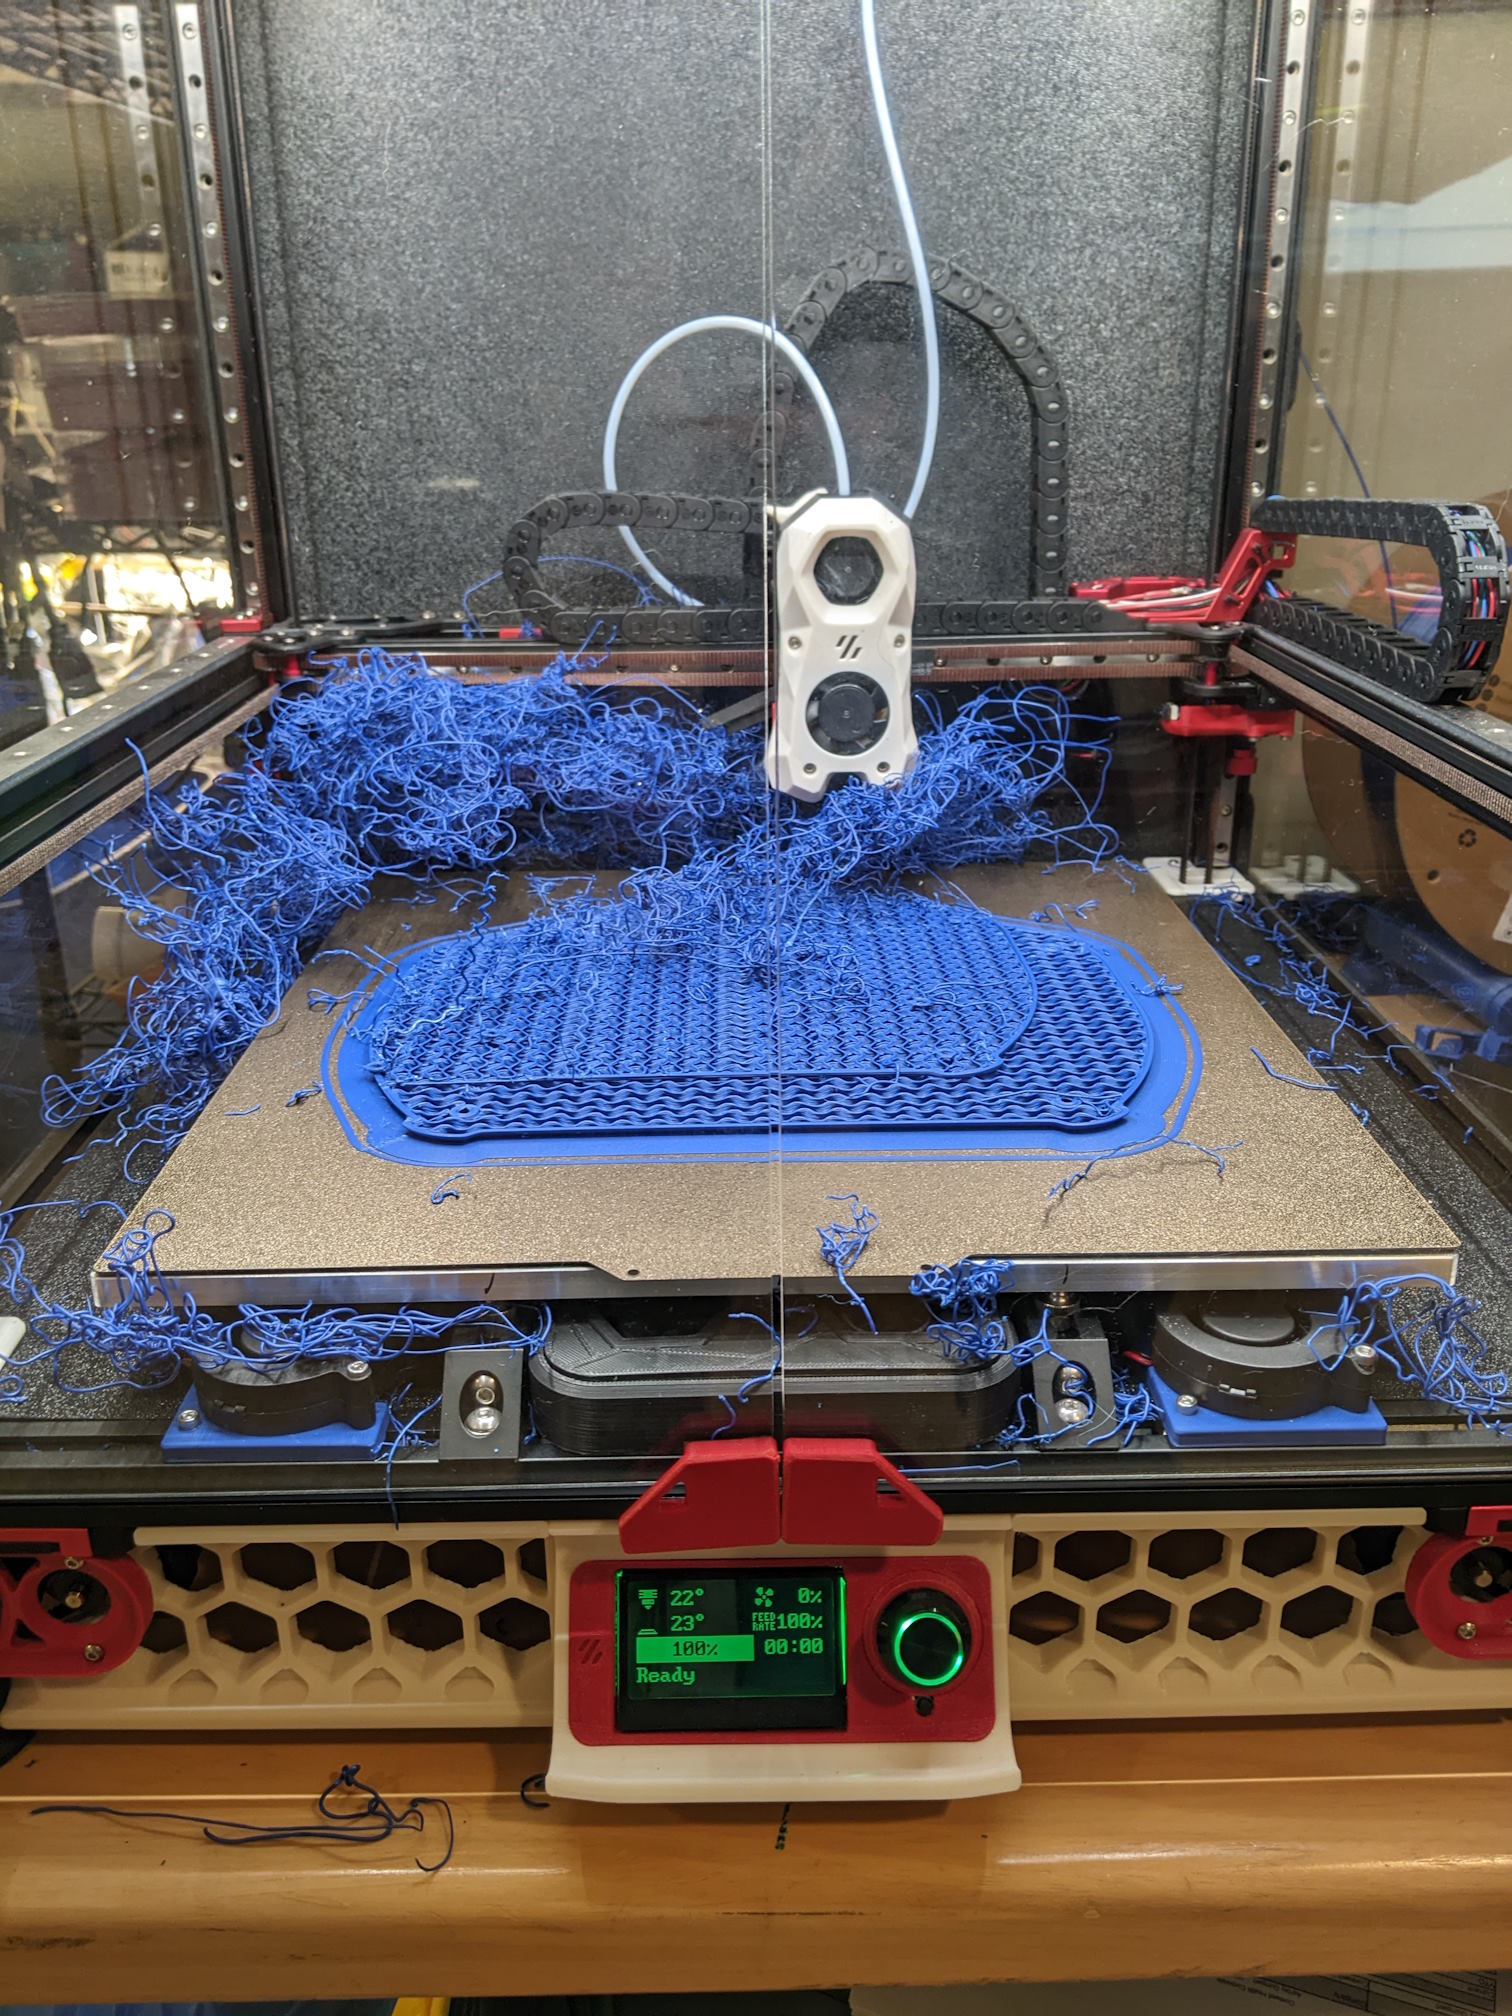
Layer lines are unavoidable imo, I’ve sorta just come to terms, I think I run a tad hot and haven’t fully tuned my profiles, but happy with it for my purposes
Layer lines are one thing, but them shifting around is very annoying. I don’t know if it’s completely a ‘me’ thing or if a large chunk of the people who posts things online only go for a beauty shot.
For example:
compared to:
(open the images in a new tab, Lemmy doesn’t always let you view them full size…)
I tend to run fast, but I’ve found that Polymaker’s ASA will print happily at 230-235 on my machine. Maybe slower + cooler would help my results. I should try a few sequential objects to find out.
Don’t get me wrong, the 2.4 is a massive improvement in quality over what I was turning out on my i3 clone.
I do it right after plate prep/cleanup
What is this plate prep you speak of? I kid, but I’m also happy that I (very rarely) have to clean or do anything to my build plate.
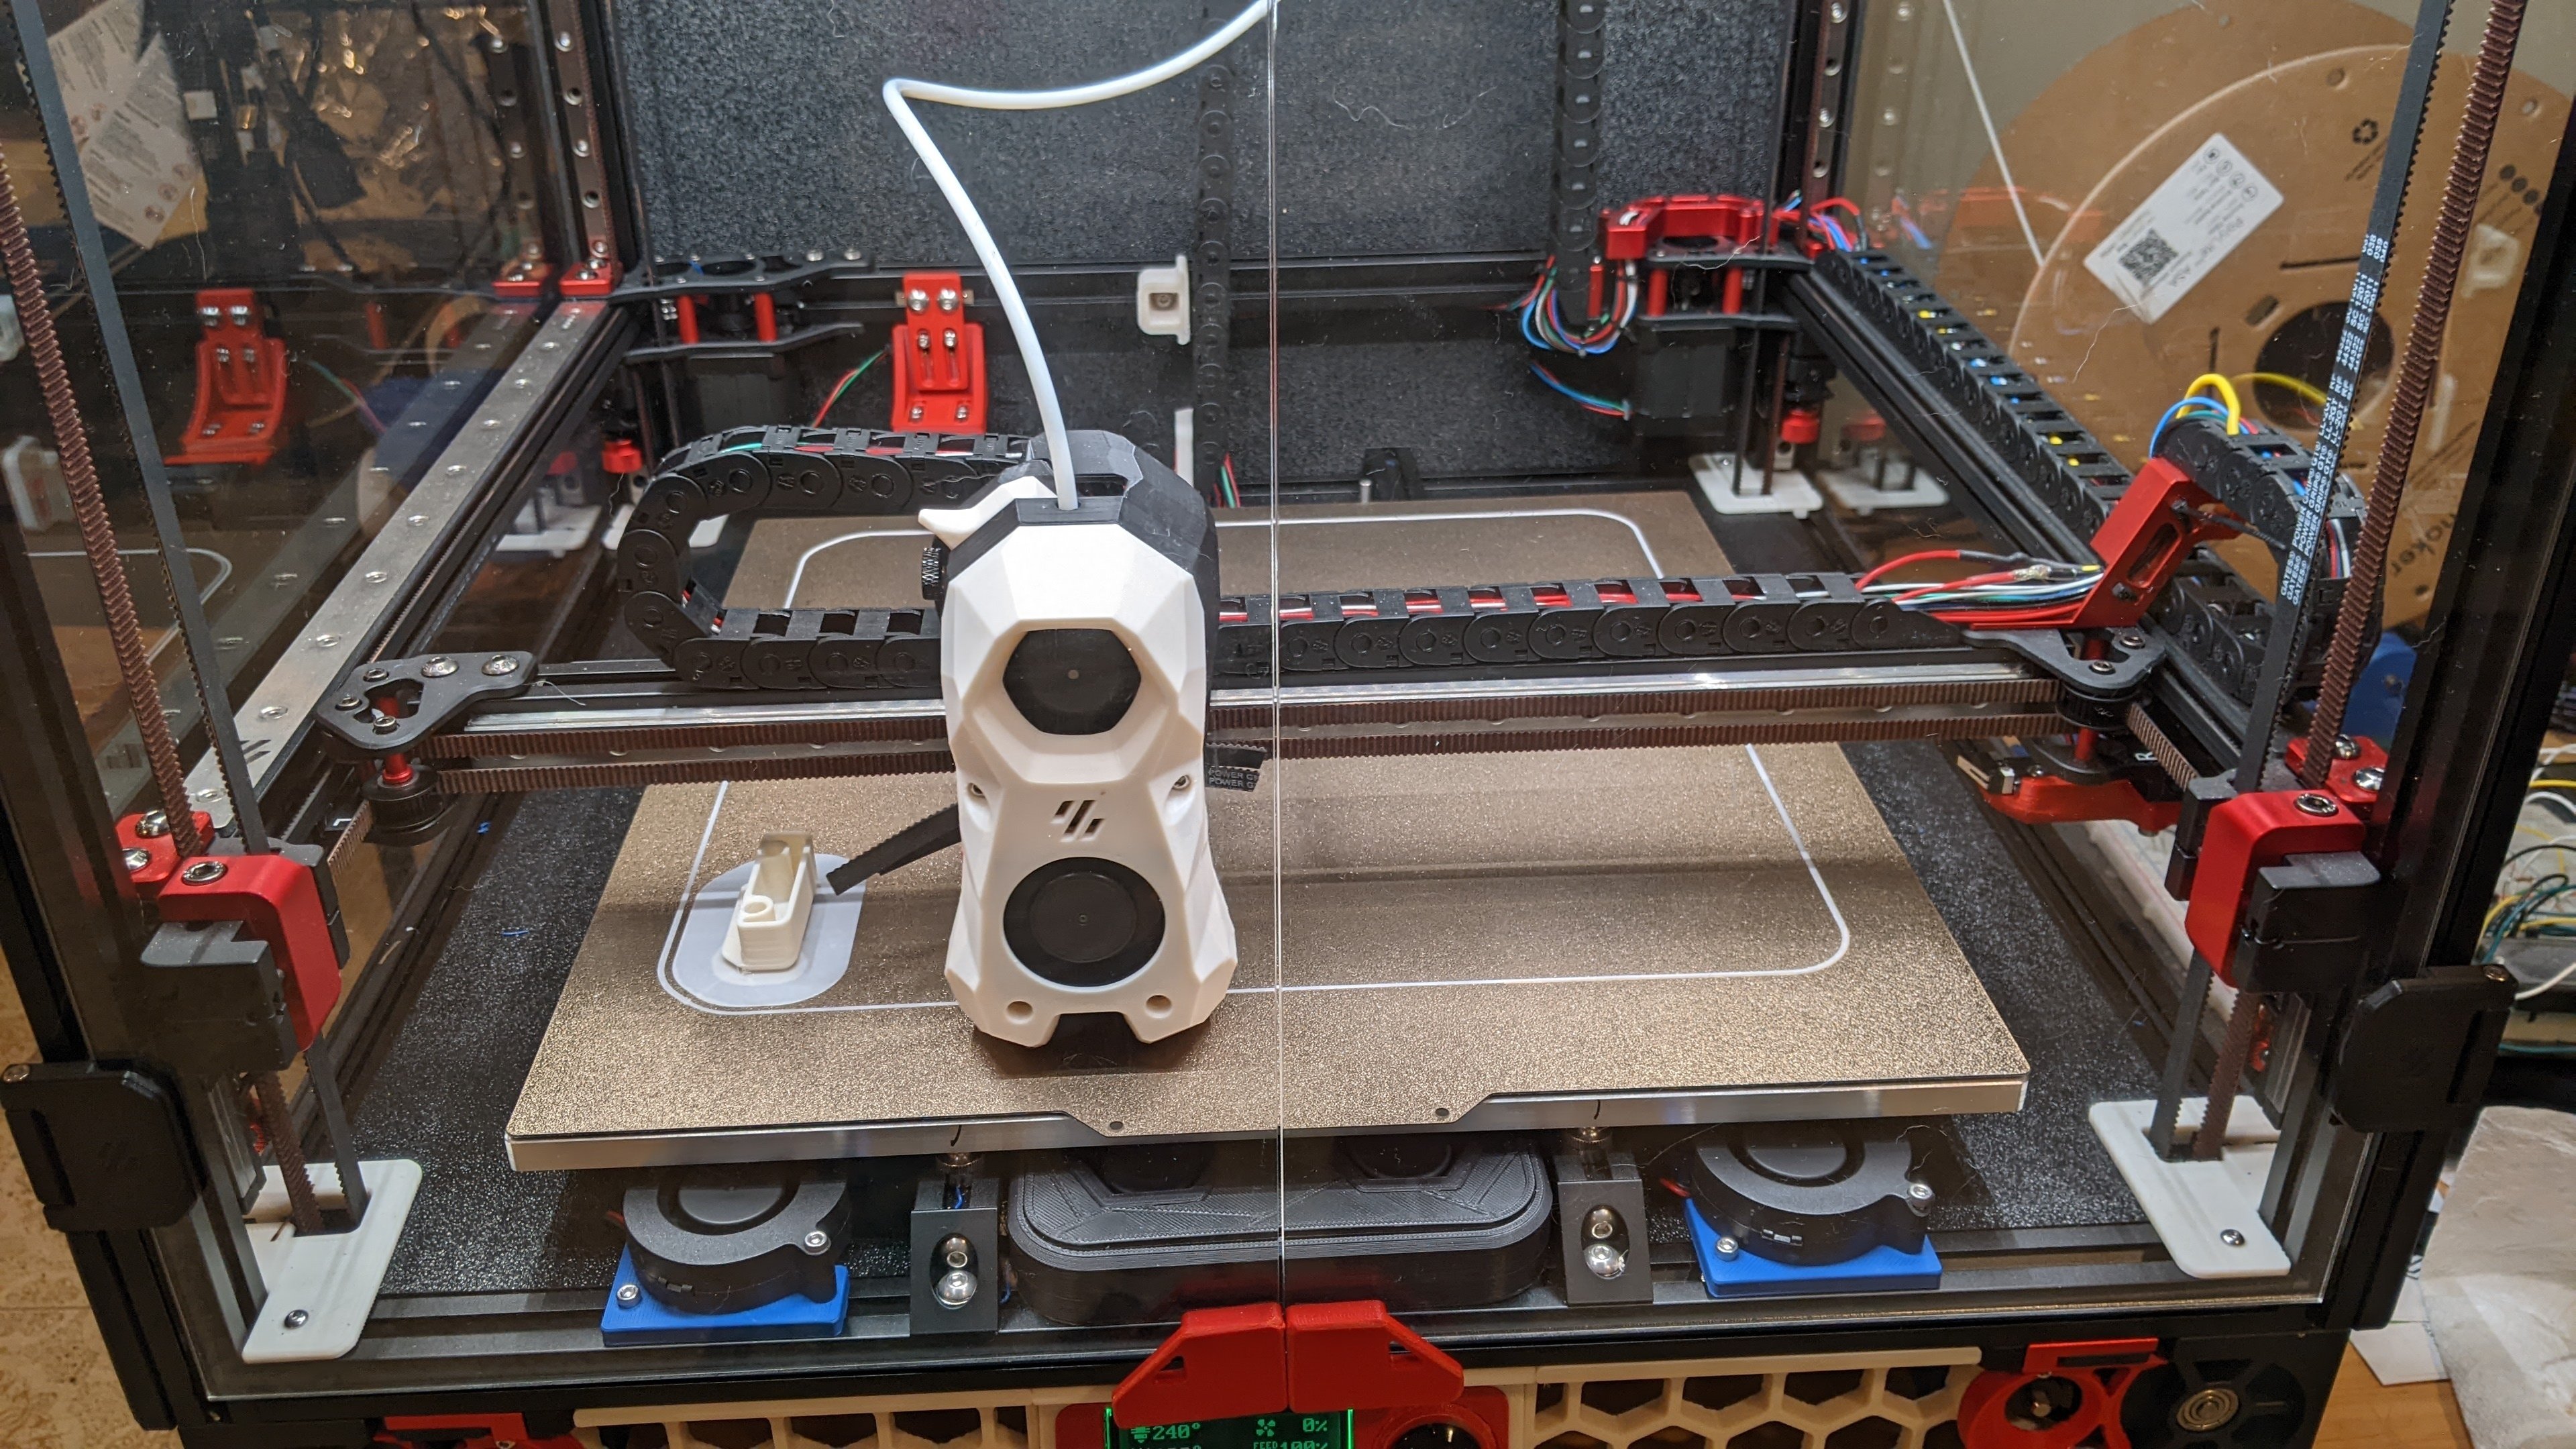
LEDs I’m mixed on, I moved my gantry cam because they seemingly were aimed right at it and you couldn’t see anything. I keep thinking about a nozzle camera, but with my current setup I really don’t feel like running another umbilical and I’m not 100% sold that it’d survive or really be that handy.
No cameras here. The lighting at the top of the frame is great for letting me see the first layer, which is really all I need to see. Now that I got z-calibration up and running, I rarely have to fiddle here. The only spaghetti I’ve encountered has been due to ASA warping, but now that I know that was chamber temp related it should be easy to avoid.
How is the rapido? I’m using dragon HF/UHF for spares and using my existing v6 nozzles, have heard the rapido has some good results.
All in, I like it. It heats up amazingly quickly compared to the extruder on my i3 clone - literally 10s of seconds. Mine doesn’t ooze or string at all and retraction tuning is a piece of cake (basically any value works fine). One tool nozzle changes are nice, but I honestly don’t change my nozzle very often. I’ve run TPU, PETG, and ASA through it without issues. The HF Rapido, which is the one I would suggest going with on a stealthburner due to height, runs v6 nozzles which is also nice. Stealthburner installation isn’t hard, but you do have to pull the bowden coupler off the top of the Rapido.
I’ve run a few ASA prints at 30-35 mm^3 feed rates and was able to do so without needing to touch my extrusion temperature. I can’t say the same for PETG - that topped out at around 20-25 mm^3 without increasing temperature. What kinds of things do you print? Are you OK with using thicker layers and bigger extrusion widths? You won’t be able to easily crack 30 mm^3 feed rate if by moving your toolhead fast - you’ll need thick(er) extrusion widths and layer heights. Play around in your slicer, all the slic3r derivatives will let you view volumetric flow on your sliced gcode. I’m not sure the extruder is worth it if you’re not going to take advantage of its ability to flow filament quickly.
USB > CAN IMO, but as I said in my post that’s going to require some printed parts which means I need to fix my wire break, which means the printer will be working again, which means I can put off a decision for a while.
LDO’s nighthawk looks very tempting though. I’ll probably buy the parts, fix my printer, print what I need, and put it all aside for my next wire break.
Was the hot end pre-assembled or did you assemble it? I suspect you have a mechanical issue, but it might just be e-steps.
Suggestions:
Pull the nozzle off, measure say 110 mm of filament upstream of your extruder motor, make a line or attach a piece of tape, extruder 100mm, and see how close to 100mm you are. No nozzle means you can do this cold so you’ve eliminated 2 variables: a nozzle clog and temp. More detailed instructions
Once you get that sorted, do a PID tune and run the 100mm extrusion test again with your nozzle attached at say 230. Different number? My money would be on a partial nozzle clog.
Finally, temp tower. Not being able to extrude below 220 seems very weird. How fast are you trying to print?